


Missed it by five minutes. The stream ended, no replay available, and now it's gone. I've been there more times than I want to count.
Live streams are tricky. Unlike regular videos, they don't sit around waiting for you. Once they're over, they're either gone completely or locked behind a paywall as VODs. And even when replays exist, streamers delete them all the time.
So I started recording streams I actually cared about. Took me a while to figure out what works and what doesn't. Here's everything I learned.

Why recording live streams is different from downloading videos
With a normal video, the file already exists. You're just grabbing a copy of something that's sitting on a server. Easy.
Live streams don't work that way. The video is being created in real-time. There's no file to download—just a continuous flow of data that your browser or app is receiving and playing back moment by moment.
This means you have two options:
- Screen recording — Capture whatever's playing on your display. Works for anything, but you're recording your screen, not the actual stream data.
- Stream capture — Intercept the actual video data as it arrives. Better quality, smaller files, but requires tools that can detect and save live streams.
Both work. Screen recording is simpler but has tradeoffs. Stream capture is cleaner but needs the right software.
The screen recording approach
This is what most guides recommend because it works on everything. You're basically recording your entire screen (or a window) while the stream plays.
Built-in tools you already have
Windows: Press Windows+G to open Xbox Game Bar. Hit the record button. Done. It captures whatever's on screen, including audio. Files save to your Videos folder under "Captures."
Mac: Press Shift+Command+5 to open the screenshot toolbar. Select "Record Entire Screen" or "Record Selected Portion." Click Record, then click Stop in the menu bar when you're done.
These work fine for short recordings. No extra software needed.
How to record a live stream on PC
If you're on Windows and want more control than Xbox Game Bar offers, here's what works best:
- OBS Studio — Free and open source. Set up a "Window Capture" source pointed at your browser, choose your output format (MP4 or MKV), and hit Start Recording. The learning curve is steeper, but you get full control over resolution, bitrate, and encoding.
- Xbox Game Bar — Already built into Windows 10 and 11. Press Win+G, click record, and you're done. Limited settings, but zero setup required.
- Browser-based capture — Tools like SaveMate's Chrome extension can detect live streams in your browser and record them directly, bypassing screen recording entirely.
For most people, the Xbox Game Bar or a browser extension is the fastest path. OBS makes more sense if you're recording streams regularly and want consistent quality settings.
The problems with screen recording
I used screen recording for months before I got frustrated enough to look for alternatives. Here's what bugged me:
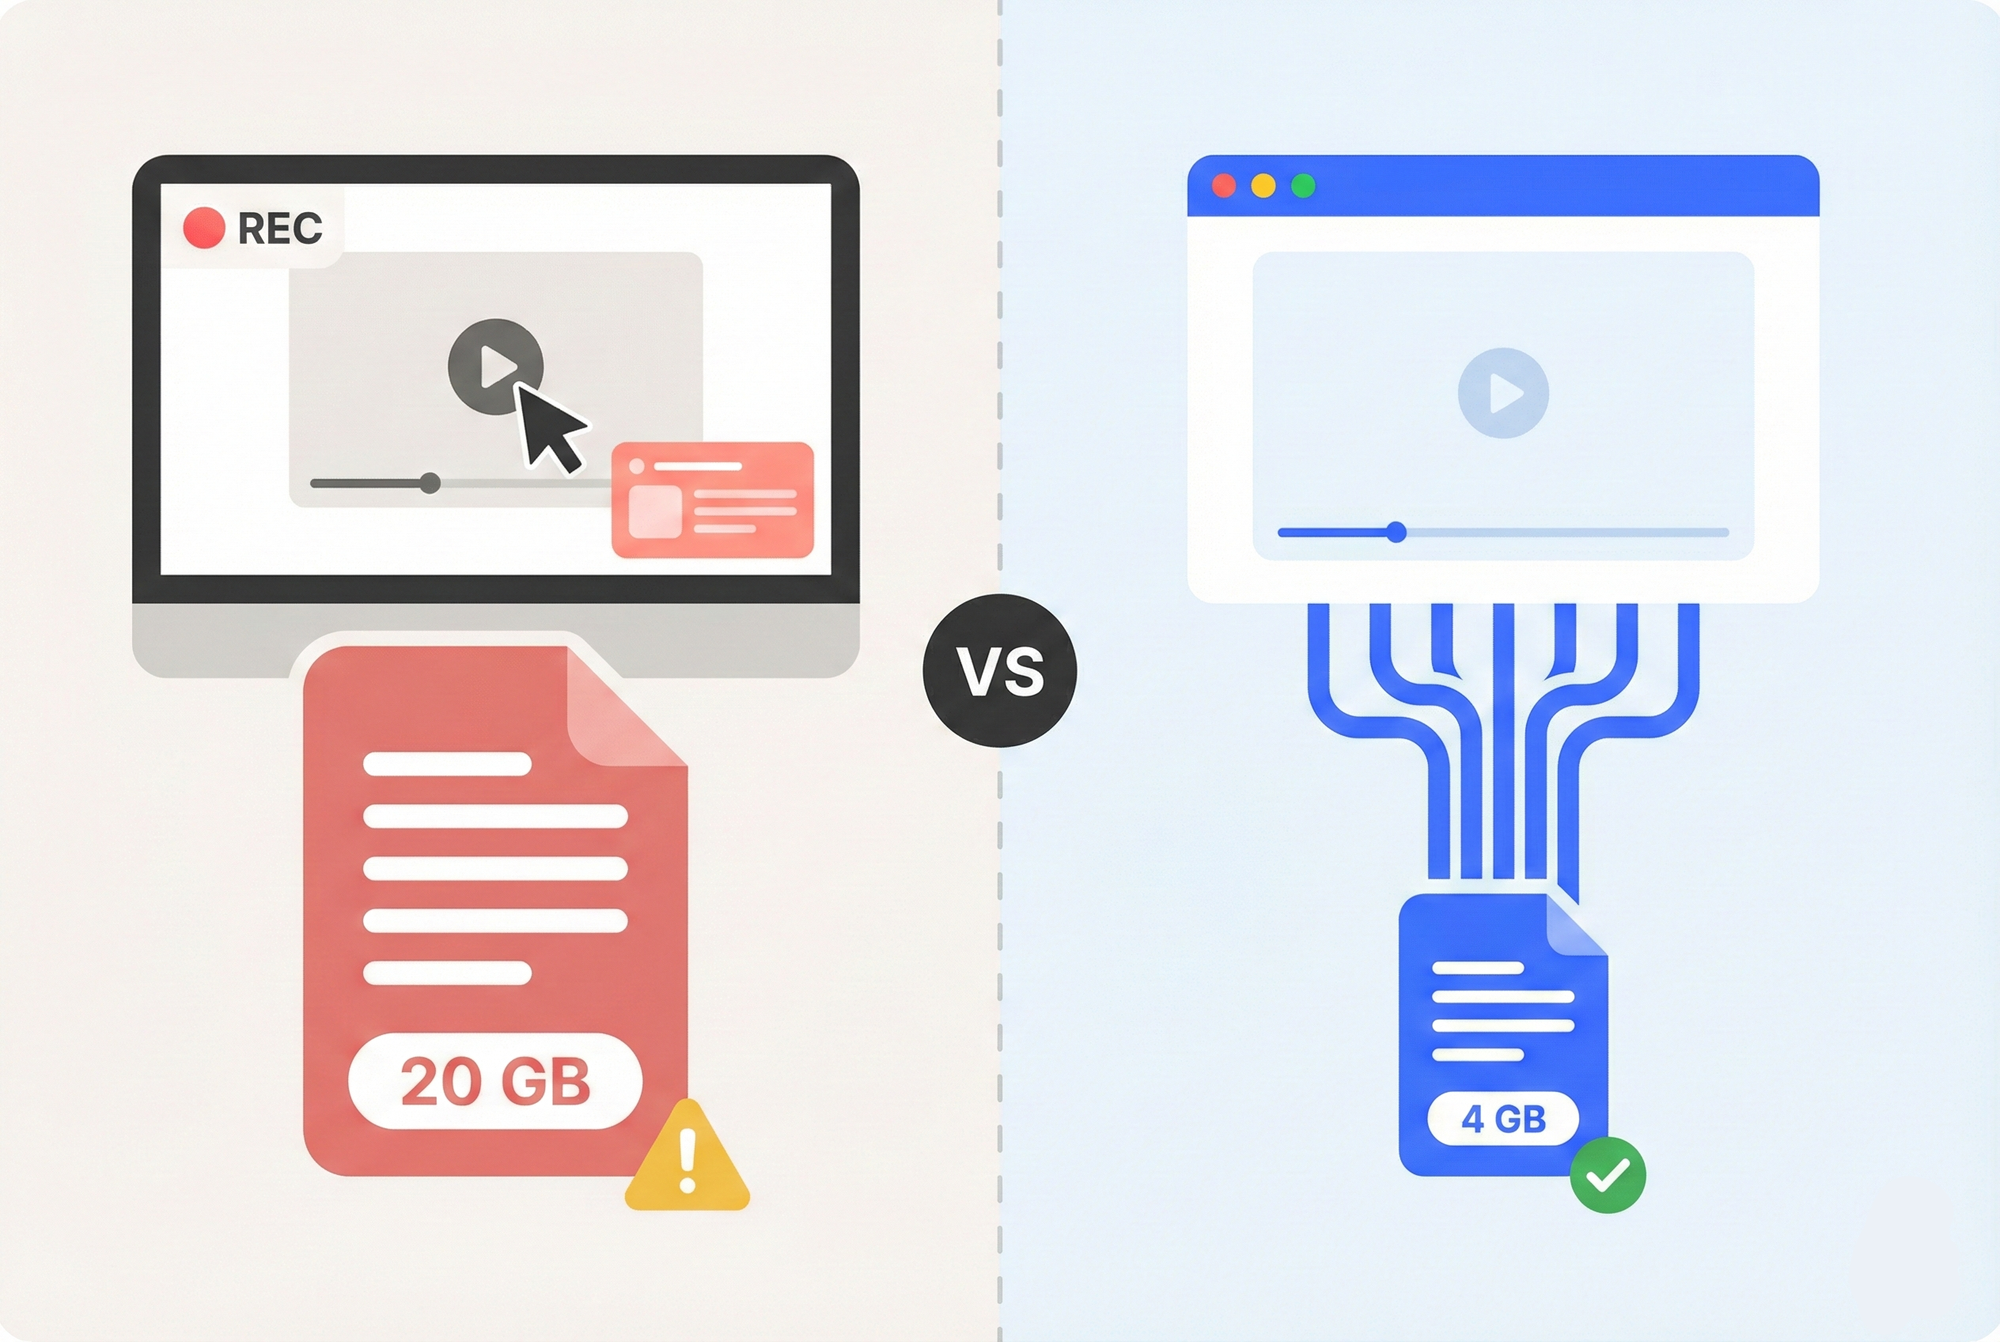
File sizes are massive. A two-hour stream recorded via screen capture might be 15-20 GB or more. The built-in tools aren't great at compression.
Quality depends on playback. If the stream buffers or drops to lower quality during playback, that's what gets recorded. You're capturing what you see, not the best available quality.
You're stuck at your desk. Screen recording means keeping the stream playing the whole time. Close your laptop? Recording stops. Need to use your computer for something else? You'll record that too.
Audio sync issues. Occasionally, the audio drifts out of sync with the video. Not always, but often enough to be annoying.
When screen recording makes sense
Despite the downsides, screen recording is still the right choice sometimes:
- One-off recordings where you don't care about perfect quality
- Streams from apps that don't work in browsers (some mobile-only platforms)
- When you need to capture something immediately and don't have other tools ready
For anything I actually want to keep long-term, though, I use stream capture instead.
The stream capture approach
Stream capture grabs the actual video data instead of recording your screen. Think of it like intercepting the mail instead of photocopying it after it arrives.
The quality is better because you're saving the original stream, not a re-encoding of what played on your display. Files are smaller, too, since you're not adding another layer of compression.
How live stream capture works
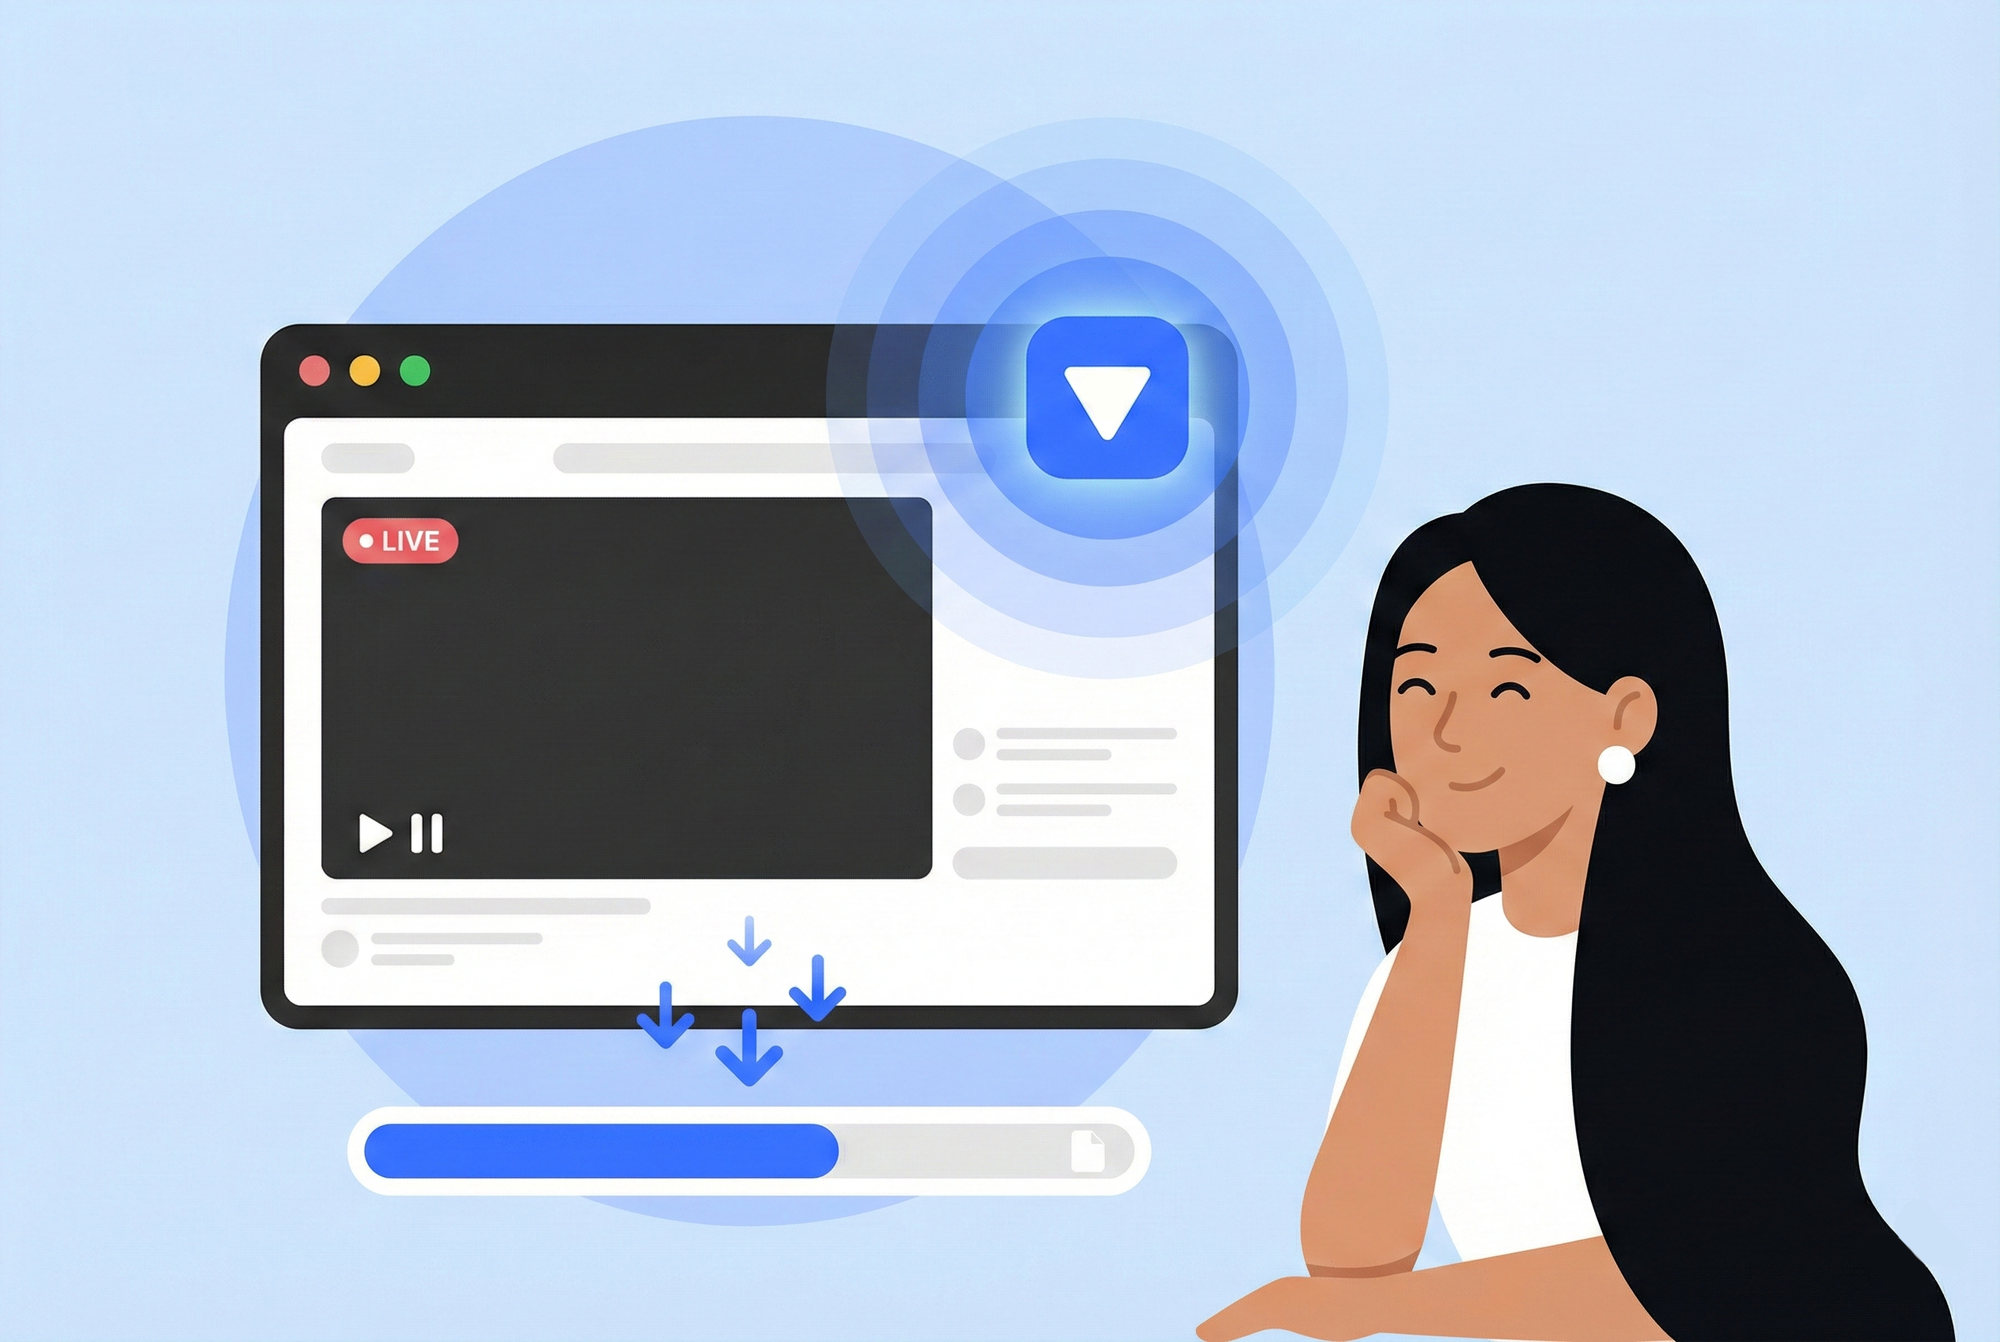
Most live streams use something called HLS (HTTP Live Streaming) or similar adaptive protocols. The video gets broken into small chunks—usually a few seconds each—and your browser downloads these chunks one after another as you watch.
Stream capture tools monitor this process and save each chunk as it arrives. When the stream ends, they stitch all the chunks together into a single video file. You end up with the same quality the broadcaster sent, not whatever your screen happened to display.
If you're curious about how HLS works under the hood and how to convert HLS/M3U8 streams to MP4, we've covered that in detail.
Tools that capture live streams
OBS Studio is the go-to for streamers themselves, but it's actually screen recording dressed up fancy. Great for broadcasting, not ideal for capturing other people's streams.
Command-line tools like yt-dlp and streamlink can capture some live streams, but they're technical and don't work on everything. If you're comfortable with terminal commands, they're worth learning. If not, they'll just frustrate you.
Browser extensions vary wildly in quality. Some work great for a while, then break after an update. Others have recording limits or add watermarks. A few legitimate ones exist, but you have to wade through a lot of junk. We compared the best video downloader Chrome extensions if you want to see what's out there.
SaveMate takes a different approach that I've found works well. Instead of screen recording or trying to find direct stream URLs, it monitors your browser for any video streams—live or otherwise—and lets you capture them directly. When a live stream is playing, it shows up in SaveMate just like any other video, and you can record it in real-time as the stream progresses.
The nice thing is you don't need to figure out what protocol the stream uses or hunt for hidden URLs. If it's playing in your browser, SaveMate can usually see it and record it.
Best live stream recorder software in 2026
Here's a quick comparison of the main live stream recorder tools I've actually used, so you can pick the right one without trial-and-erroring your way through all of them:
- OBS Studio — Free, open source, endlessly configurable. Best for: people who already use OBS or want granular control. Downsides: steep learning curve, it's screen recording (not true stream capture), and massive file sizes.
- yt-dlp — Free, command-line tool. Best for: tech-savvy users who want to capture YouTube and Twitch streams directly. Downsides: requires terminal knowledge, doesn't work on every platform, and live stream support can be inconsistent.
- Streamlink — Free, command-line. Best for: piping live streams to a media player or file. Downsides: similar to yt-dlp—powerful but not user-friendly.
- SaveMate — Chrome extension with cloud backup. Best for: anyone who wants to record streams without thinking about protocols or command lines. It detects streams automatically in your browser and lets you save them to your cloud library for later. Downsides: browser-based, so it only works for streams playing in Chrome.
If you just need something that works right now, a browser extension is the fastest path. If you want maximum control and don't mind complexity, OBS or yt-dlp gives you that.
Practical tips for recording streams
After messing this up plenty of times, here's what I've learned actually matters:
Start recording before the stream begins
Seriously. If you care about catching the beginning, have your recording ready to go before the scheduled start time. Streams often start a minute or two early, and fumbling with software while the intro plays is how you miss things.
Check your storage space first
Live streams eat storage fast. A typical two-hour stream at 1080p runs 4-8 GB depending on bitrate. At 4K, you're looking at 15-25 GB. Make sure you have room before you start.
I keep a dedicated folder just for stream recordings and clear it out every few weeks. Otherwise, it fills up my drive without me noticing.
Test your setup on something you don't care about
Don't make a once-in-a-lifetime stream your first attempt at recording. Try it on a random Twitch channel or YouTube live first. Make sure the audio works. Make sure the file actually plays back. Make sure you know where it saves.
Finding out your recording failed after the stream ends is a special kind of frustration.
Record at source quality when possible
If you're using stream capture, you'll usually get the quality the streamer is broadcasting. But if you're screen recording, make sure the stream is playing at max quality before you start. Check the settings gear on the video player and bump it up to 1080p or whatever the highest option is.
Have a backup plan
Sometimes things fail. Internet hiccups, software crashes, and computer restarts for updates. If a stream really matters, run two recording methods simultaneously. Screen record as backup while your main tool captures the stream. Belt and suspenders.
How to save a live stream for later
Recording and saving are slightly different problems. Recording means capturing the stream as it happens. Saving means making sure you still have it weeks or months from now.
I've lost recordings before—accidentally deleted the wrong folder, ran out of disk space and didn't notice, or just forgot where I saved something. Here's what actually works for keeping streams long-term:
- Rename files immediately. "stream_capture_2026-02-04_14-23.mp4" tells you nothing six months later. Rename it to something like "GDC-keynote-feb-2026.mp4" right after recording.
- Back up to the cloud. Local drives fail. If a recording matters, upload it to Google Drive, Dropbox, or a similar service. SaveMate's cloud backup feature can auto-sync recordings to your cloud storage so you don't have to remember to do it manually.
- Keep a simple log. I use a text file that lists what I recorded, when, and where the file lives. Sounds old-school, but it's saved me from digging through folders more than once.
The goal is simple: if you cared enough to record it, make sure you can actually find and play it later.
What about recording streams you're not watching live?
Sometimes you can't watch when a stream happens. Work, sleep, timezone differences—life gets in the way.
A few options:
Schedule recordings — Some tools let you set up recordings in advance. Hit record, leave it running, come back to a finished file later. This only works if you can leave your computer on.
Wait for the VOD — Many streamers make replays available afterward. These are regular videos you can download normally instead of recording live. The catch: not everyone enables replays, and some delete them after a few days.
Ask someone else — Community discords and subreddits sometimes have people who record popular streams. Worth asking if you missed something.
Recording streams from specific platforms
How to record Twitch streams
Twitch streams use HLS, which most capture tools handle fine. The bigger issue is that Twitch actively discourages third-party recording. VODs are often available, but streamers can delete them, and some content gets muted due to music copyright.
If you want to keep something from Twitch, don't assume the VOD will stick around. Record it live or grab the VOD as soon as it posts.
How to record YouTube live streams
YouTube Live is generally easier. Most live streams become regular YouTube videos afterward, available to download like anything else. But some creators set streams to private or unlisted after they end, and members-only streams stay locked.
Recording during the live broadcast guarantees you have a copy regardless of what happens to the VOD.
How to record Facebook and Instagram live streams
These are trickier. Both platforms make it hard to save live videos. Screen recording often ends up being the most reliable option here. Some stream capture tools work on Facebook Live through the browser, but Instagram Live typically requires screen recording from a phone or emulator.
Smaller or niche platforms
Random streaming sites, membership platforms, webinar tools—these vary wildly. Some use standard HLS that tools can capture. Others use proprietary players that block recording. Trial and error is usually the only way to find out.
Quality and file size expectations
Live stream recordings tend to be bigger than equivalent on-demand videos. Here's roughly what to expect:
- 720p stream, 2 hours: 2-4 GB
- 1080p stream, 2 hours: 4-8 GB
- 1080p60 stream, 2 hours: 6-10 GB
- 4K stream, 2 hours: 15-25 GB
Screen recordings run larger because they re-encode everything. Stream captures are closer to the lower end of these ranges.
If storage is tight, you can always re-encode recordings after the fact to shrink them. Handbrake is free and does this well. But keep the original until you're sure the re-encode looks okay.
A note on what you're allowed to record
Recording streams for personal use—watching later, archiving something you love—is generally fine. Redistributing recordings, uploading them elsewhere, or selling access is where you get into trouble.
Streamers put work into their content. Recording so you can watch on your own time is different from ripping their work and posting it as your own. Be cool about it.
Frequently asked questions
Can you record a live stream without the streamer knowing?
Yes. Screen recording and stream capture both happen locally on your device. The streamer has no way to detect that you're recording. That said, respect the creator's work—record for personal use, not redistribution.
What's the best free live stream recorder?
For screen recording, OBS Studio is the best free option with the most features. For stream capture, yt-dlp is free and powerful if you're comfortable with the command line. For something easier, SaveMate's browser extension detects and records live streams automatically.
How much storage do you need to record a live stream?
Plan for about 2-4 GB per hour at 1080p with stream capture, or 4-10 GB per hour with screen recording. 4K streams can use 8-12 GB per hour. Always check your free space before starting a long recording.
Can you record HLS streams directly?
Yes. Most live streams use HLS (HTTP Live Streaming), which breaks video into small downloadable chunks. Tools like yt-dlp, streamlink, and browser extensions like SaveMate can intercept these chunks and stitch them into a complete video file. This produces better quality and smaller files than screen recording.
Bottom line
Live streams don't have to be "watch it now or miss it forever." With the right setup, you can record anything that plays in your browser and watch it whenever you want.
Start simple with your OS's built-in screen recording if you just need to grab something quick. Move to stream capture tools like SaveMate when you want better quality without massive files.
Either way, test your setup before the stream you actually care about. There's nothing worse than realizing your recording failed after a three-hour stream ends.
The streams that disappear are often the ones most worth keeping. Don't let them slip away.